Avoid Vacuous Thinking

Note: I wrote this article three months ago. It has been in my drafts for a while and I am trying to publish some articles to gain momentum for this blog. Even though the publish date is November 30, it was written in August.


An article was posted on Hacker News today from the website Farnam Street (FS). The article talks about “second-order” thinking, which can be thought of as thinking about the Implications of the implications. If first-order thinking is “this cause produces this effect”, then second-order thinking is asking “what effects are caused by this initial effect”?

Now, I am not really here to talk about the merits of second-order thinking. I think it really just amounts to thinking in systems. But I have a bit of a problem with the FS blog itself, and people who essentially take everyday observations and make them into deep shallows.

The blog post title is “Second-Order Thinking: What Smart People Use to Outperform”. Already, this activates some subconscious needs. “Wow, ‘Smart People™’ use this to be the best? I want to be smart! I want to be the best! Let’s keep reading.” It preys on the insecurity of the reader. While I understand given the current internet climate, the need for clickbait simply to make a living as a digital content creator is a necessary evil, I can’t help but think it is unnecessary here.

The blog post itself is also devoid of any real meaning. Second-order thinking can be reduced to thinking through the consequences. There is a lot of pomp and circumstance around the idea that to make good decisions, sometimes things are not what they seem. A seemingly negative decision might produce a more positive long-term decision. This isn’t revolutionary, it goes back to freaking Aristotle.

Now, that’s not to say that everyone does this all the time. The advice to think through the effects is a good idea. However, framing it as some magical, secret technique that the Titans of Industry™ don’t want you to know is just laughable. This is something everyone can do, but patronizing your audience isn’t a great method to do it, in my opinion.

The action points are not bad advice. Ask “and then what”. That is good advice. Think beyond the obvious. But this is vague. What does it mean? It depends on the context.

I want to say that this is not a personal attack on Shaun, who runs Farnam Street. He does put out good articles with thought-provoking content. I think this particular one missed the mark a little, and if anything came to me at the right time to prompt this blog post.

Making my first pizza from scratch

Lately, I have been trying to build my cooking skills. I recently found a YouTube channel run by a home cooking chef named Ethan Chlebowski that features approachable and very tasty recipes. It’s also nice that Ethan makes cooking feel less intimidating, much like J. Kenji Lopéz-Alt. Recently I decided to follow his weekly pan pizza recipe and make a Detroit-style ‘za with homemade tomato sauce and mozzarella.

Bottom line: I think it turned out great! Especially since I have never made dough nor tomato sauce from scratch.

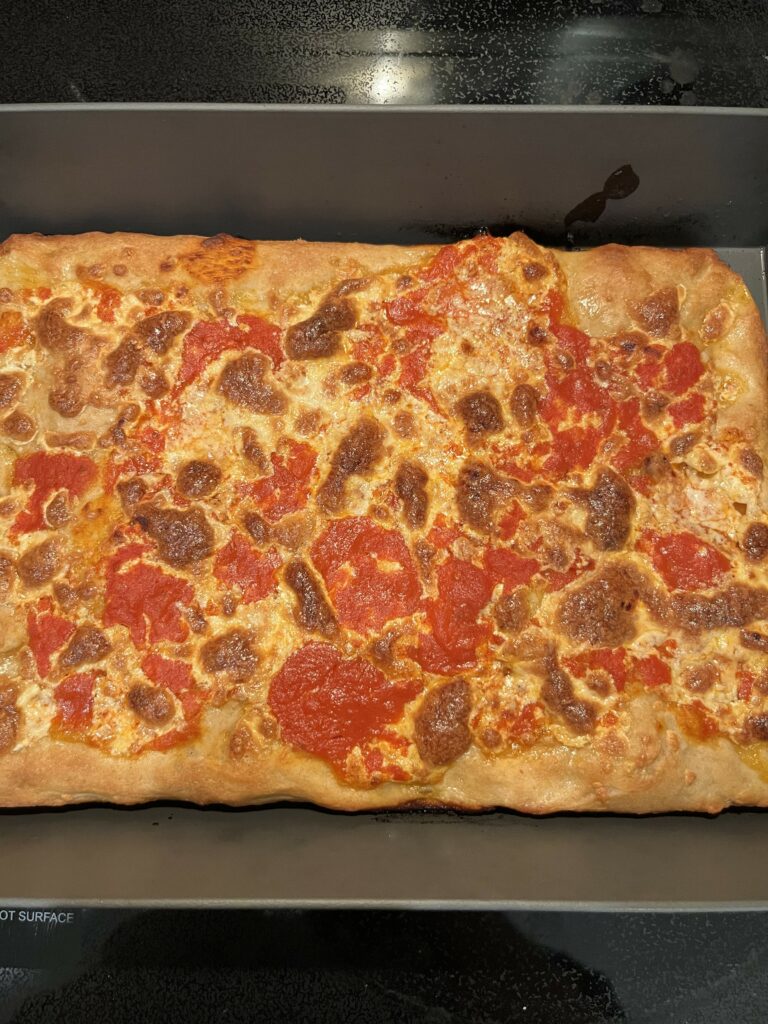
The Final Result

Those brown spots are not meat, but cheese that was a little too cooked (I think).

Agh! Where’s the circle?! Yes, I too was a bit skeptical of Detroit-style rectangular pizza, but it was worth it. It took about 90 minutes, and I learned a ton about dough and sauce making. The specifics of the process are in Ethan’s video and are easy to follow. I wanted to give my thoughts about specific parts and how I troubleshot problems that arose and what specific nuggets I learned.

The Dough

I had never made dough before. I was intimidated. I have seen many people mention making doughs and it seemed like there are endless possibilities for error. However, I went in confident, and actually it was quite easy. I even put in a bit more water than was suggested, which I worried would ruin it, but seemed to not matter.

A big risen dough ball made of half bread flower and half white whole wheat flower in a glass bowl.

Ethan’s measurements are all by weight in this recipe, and that is the way to go for me. Many fewer things to clean at the end (since I just weight everything in one bowl) and less likely to screw up. The dough was extremely sticky at the beginning but seemed to come together a bit easier after some kneading. Wow, kneading is hard work. I know that seems obvious but my forearm was actually sore after only like 10 minutes worth of kneading. How do cats do it all the time?

Taste-wise, the dough was delicious. A bit chewier than I usually go for but the crisped edges and fluffy core were divine.

The Sauwce

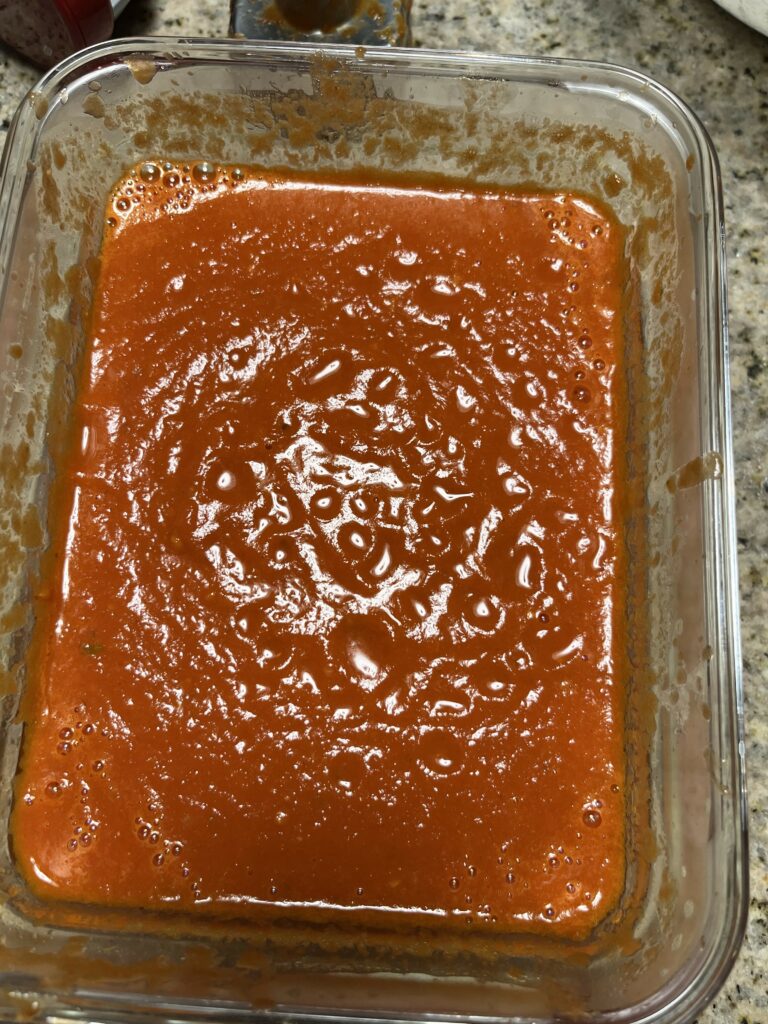
I had never made tomato sauce from scratch. I used San-Marzano canned whole tomatoes and let them get to know some olive oil (ran out of butter!), a quarter of an onion, some basil, salt, and smashed garlic cloves. I had never really used an immersion blender before, but blending all of that was super fast.

Homemade tomato sauce blended with an immersion blender.

This stuff is so good. I have already had it on pasta, and it is 10x better than store-bought sauce. I am beginning to see where, for me, it makes sense to make certain staples regularly to have on hand for multiple meals. This is probably “doy” for most people, but I kind of have to experience something first-hand to understand it fully.

An interesting little problem I ran into was my stainless steel sauce pot. I stupidly had boiled some salted water in it a little while ago, before I knew that you were supposed to add salt to boiling water instead of dump it in before it boils. So, I had some pitting on the bottom of my pot and I wasn’t sure if it was safe to cook with still (maybe it would leech aluminum or nickel? I wasn’t sure.). Turns out, as per my cookware manufacturer’s site, it is totally safe (though irreversible).

Closing Thoughts

One more look at the goodness.

A few closing thoughts. First, the biggest problem for me was the lack of topping cohesion. I wanted those toppings to be at the very edge of the crust all over the pizza, and I had thought when I put them on that they would melt and spread out to cover more area than they actually did. This is a small critique but I think it would have improved the pizza. I also think some more mozzarella cheese and a little more sauce would have improved the taste.

Second, this was a big confidence booster for me. As someone who never grew up with thorough cooking instruction, this was a relatively big step for me. I am very proud of myself that I was able to successfully follow a recipe yet modify it for my tastes without disaster.

Setting up Git and Github on macOS

Recently, I tried to connect my local directory to GitHub. I am new to programming, and most of the guides I came across were for GitHub pre-Microsoft acquisition. In particular, the personal access tokens were not part of the process, which was confusing. I’m no expert, but thought I would write a quick guide for anyone else frustrated.

Install git

I am assuming some level of computer literacy with this post, so Google anything confusing!

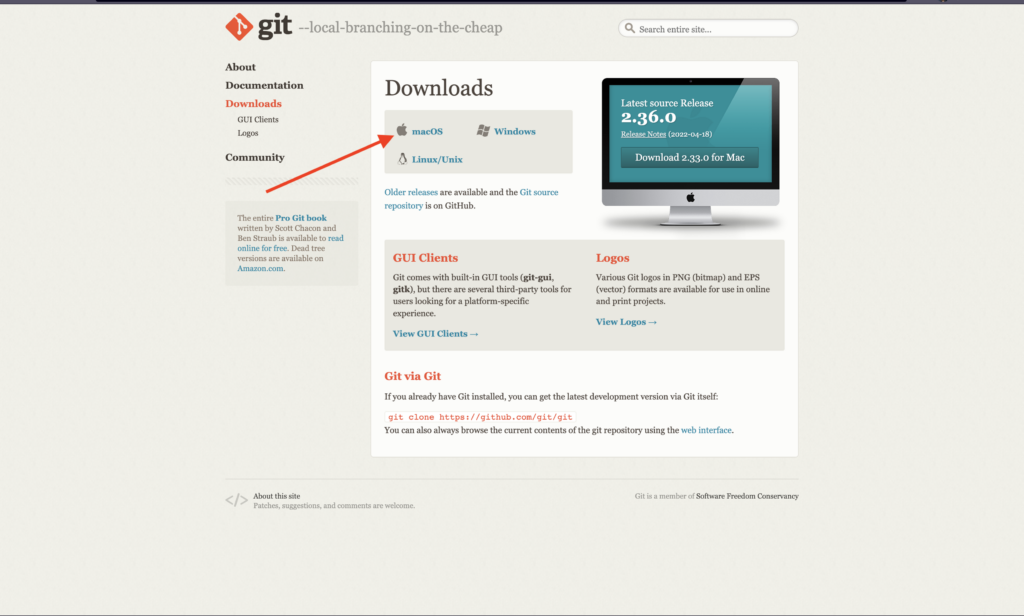
First, we need to install git. Download and install git from this website. Click on downloads, then download the macOS client.

Download the macOS installer from the git website

To check if you installed git, open Terminal (I’m using iTerm2, but the preinstalled macOS Terminal works perfect), and type:

git --version

Register on GitHub

Next, we need to register for a free account on GitHub.

Register for an account on Github

Create a Personal Access Token (PAT) For Your Computer

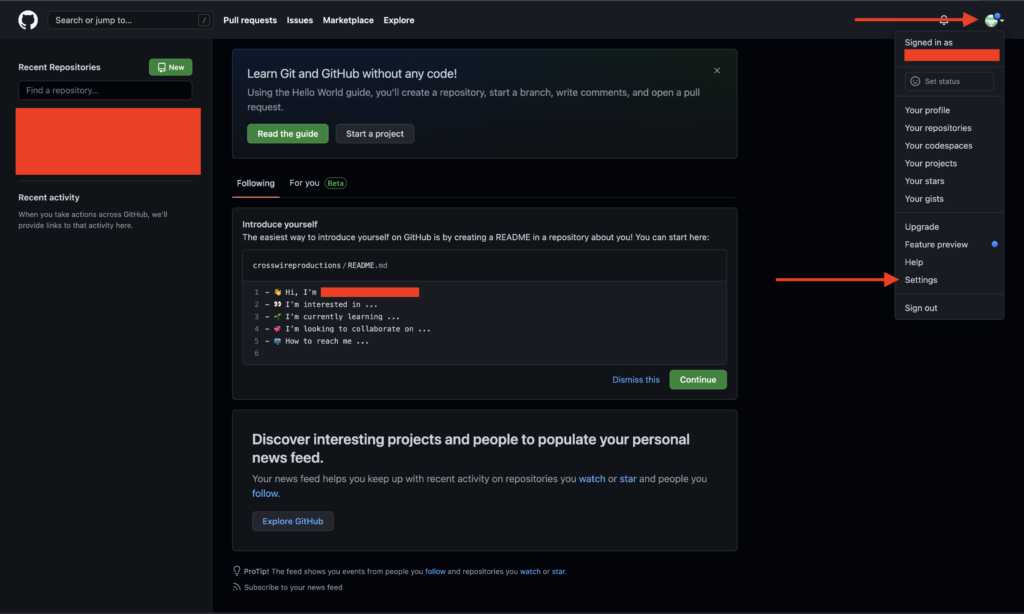
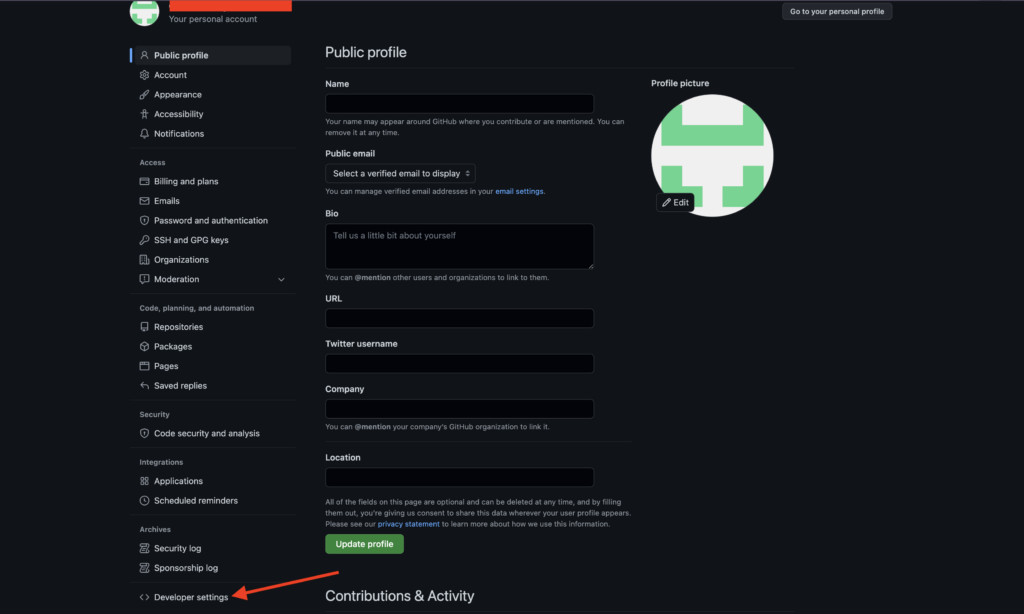
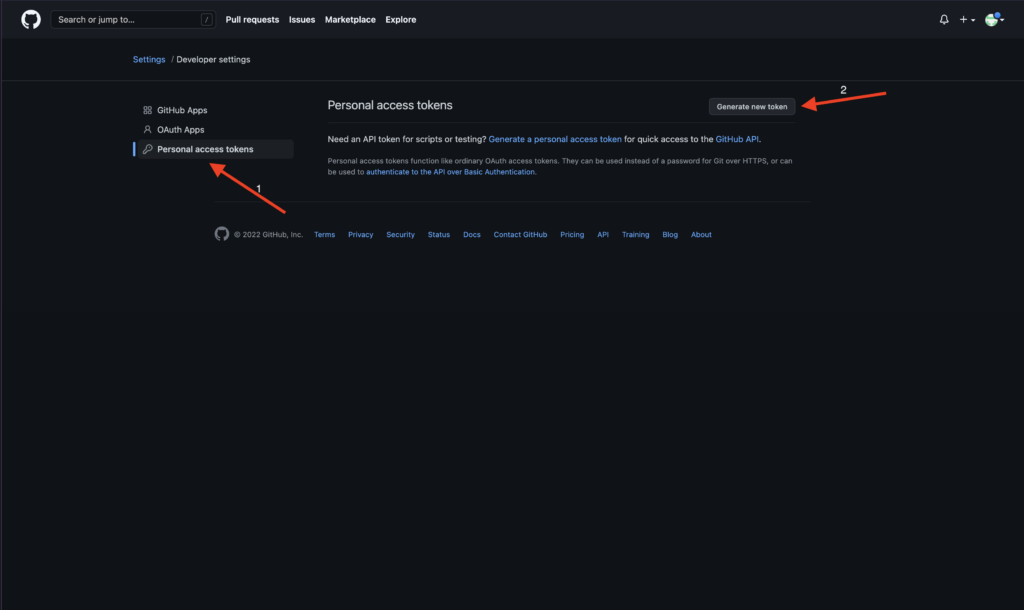
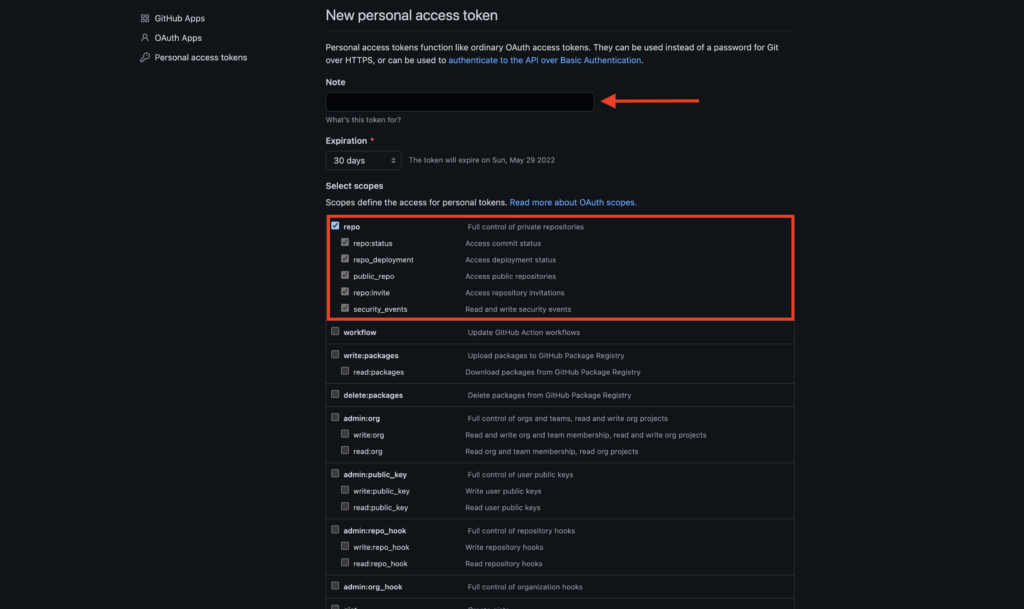
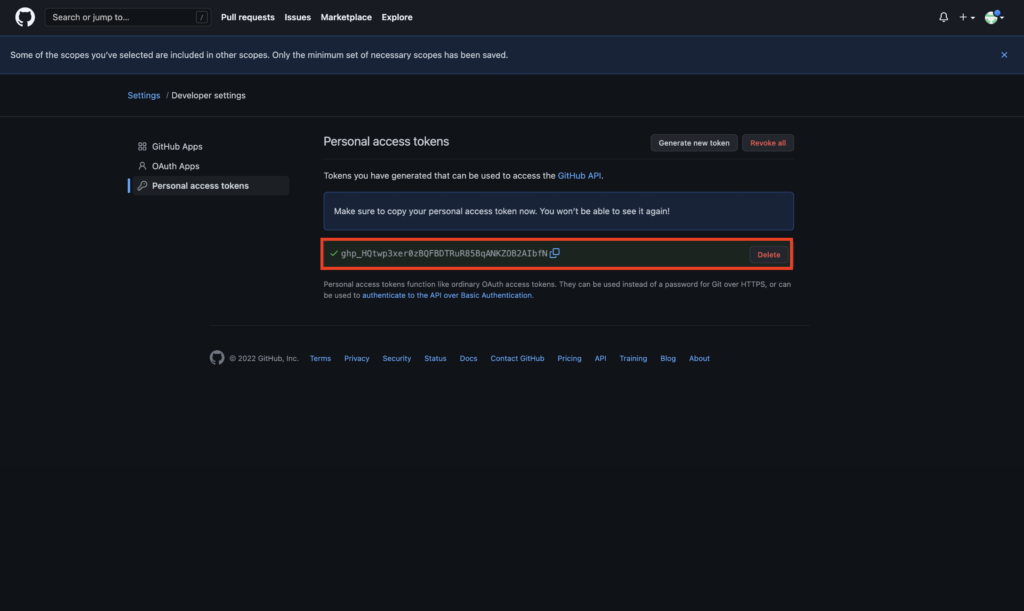
Here’s where the other tutorials were confusing for me. In August 2021, GitHub decided to prevent password authentication using git. Instead, you need to create a Personal Access Token (PAT). Refer to the picture and steps below for the process.

  1. Click on your GitHub profile in the top right-hand corner
  2. Click on “Settings” at the bottom
  3. Click on “Developer Settings” in the bottom left-hand corner
  4. Click on “Personal Access Tokens” and “Generate”
  5. Enter a description for the token, and ensure that at least the first checkbox is ticked
  6. Click “Generate”

Connect PAT to Keychain Access

Next, you need to put your PAT into the Keychain Access.

Steps to connect to Keychain Access:

  • Press CMD + Space bar, and search for Keychain Access. It will pop up.
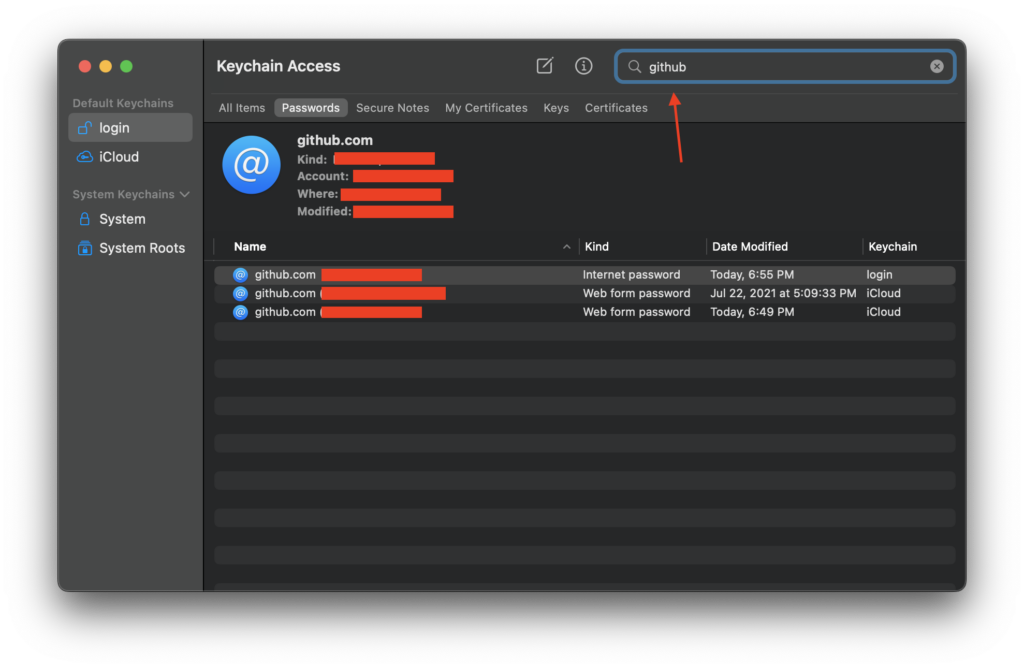
  • Click on “Passwords” and search for GitHub.
  • Double-click on the GitHub entry for the account you want to push your file to.
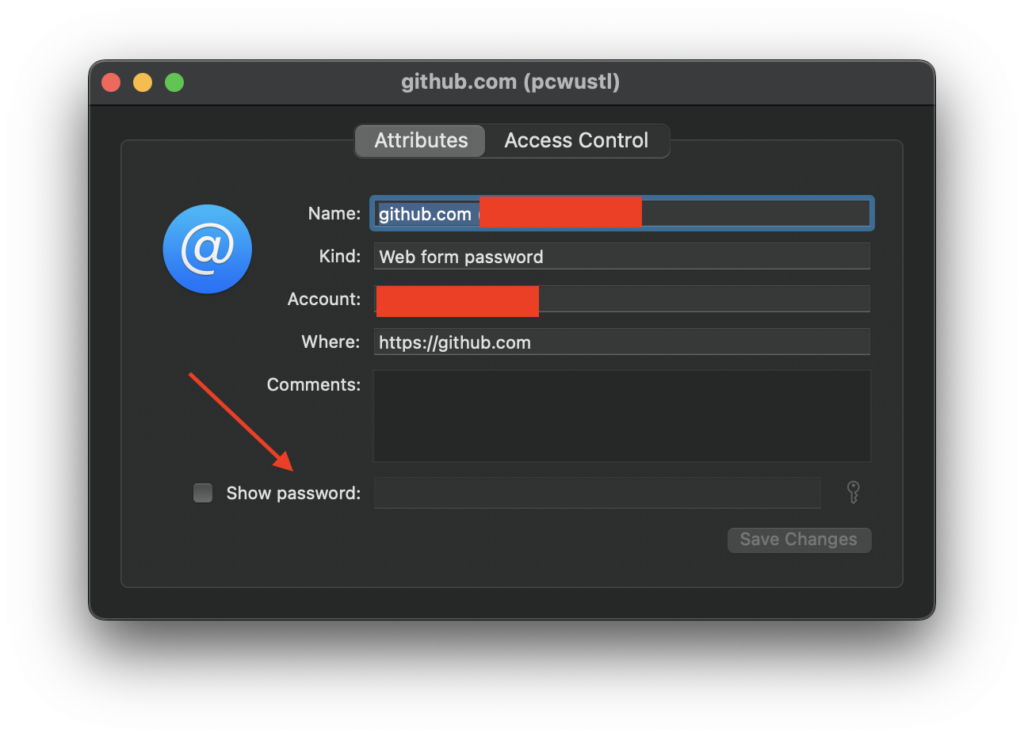
  • Click on “Show password”, input your computer account password, and then paste in the generated PAT from the previous step (instead of your GitHub password).

Using git and GitHub

Now, on to actually using git and GitHub to stage files.

First, we add our GitHub email and username to git. To do this, enter the following code:

git config --global user.email "[email protected]"
git config --global user.name "yourgithubusername"

Now we need to stage a file that we want to push to our repo. I have a file called “test.py” in a folder called “test” on my desktop. We are going to stage that file and push it to our example repo. First, we need to change directories (cd) to the location of the folder in our filesystem:

cd "/Users/username/Desktop/test"

Next, we need to initialize a local repository; that is, one that is in the folder on our system:

git init
git status

Once we’ve initialized the repository, we can add the file we want to push to GitHub, in this case, “test.py”. We type:

git add test.py

Now, we can commit this file to git with a message. Adding an encompassing but concise message allows for collaborators to see what you did and for you to keep track of code changes. Type:

git commit -m "upload message"

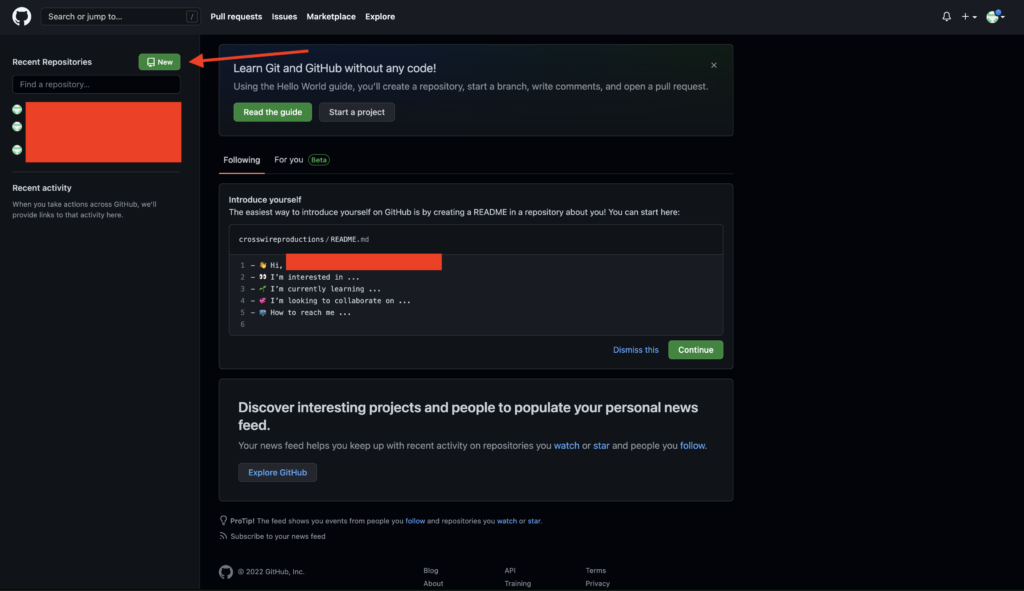
Almost done! Now we just need to “sync” our git with GitHub by “pushing” our local folder to the cloud. We first need to create a new repository in our GitHub account. From your GitHub homepage, click on the green new repository button:

Green new repo button in the top left

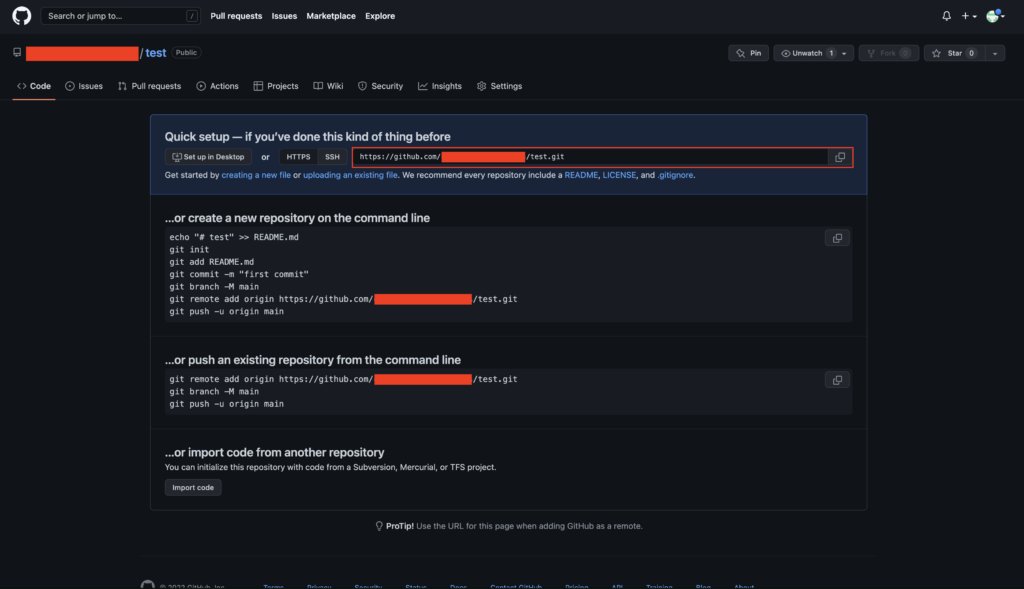
Give your new repo a name and click create. At the top of the page will be an address in HTTPS and SSH. Click on HTTPS and copy the address.

Select the HTTPS address

Now we can push our file to GitHub. This is done with the following two lines:

git remote add origin address
git push -u origin main

In place of address, paste in the .git GitHub address you just copied. That’s it! You’ve just pushed your file to GitHub.

Conclusion

Hopefully you now have git and GitHub set up. If I missed anything, feel free to let me know!

Working Principles

I strive to be as open and honest as possible in the work I do. These are some principles I found have served me well over my work experience.

  1. Process over product: while products are important, focusing on process lowers the bar to starting and eases my struggle with perfectionism.
  2. Authenticity: I can only be myself. I don’t overshare, but I am a (mostly) open book*. I make mistakes as I learn, but rarely make the same mistake twice.
  3. Openness: Related to Authenticity, I try to “work with the garage door up”. Collaboration and diversity of input mean a more resilient product.
  4. Work is a game, but it’s a crucial game: This is a modified principle from a foundational book I read long ago. The work I do is usually helping other people, to the best of my ability. This is a serious mission; but taking myself so seriously all the time only serves to hinder the flexibility I have as a human.

* Despite this, I am a privacy advocate 🙂